Signing and Marking Standard (SMS) Drawings
Signing and Marking Standard (SMS) Drawings
This page provides a PDF copy of the Traffic Engineering Signing and Marking Standard Drawings. The issue date is provided to assist the user in determining the most recent revision (but is not the official release date of the Standard). It is the responsibility of the user to make sure they are using the most recent revision. Signed drawings are on file in the Traffic Engineering Office. Drawing numbers and content change periodically.
A history of changes is available on the SMS Drawing Change List.
| Series | Drawing Number | Drawing | Drawing Name | Revision Date |
|---|---|---|---|---|
| M | M-1 |  |
Curb Markings For Raised Median and Islands | June 2014 |
| M | M-2 (1/3) | .jpg "Drawing M-2 (1of3) Intersection Striping") |
Intersection Striping | January 2020 |
| M | M-2 (2/3) | .jpg "Drawing M-2 (2of3) Intersection Striping") |
Intersection Striping (Two-Lane Rural) | May 2015 |
| M | M-2 (3/3) | .jpg "Drawing M-2 (3of3) Centerline Reverse Curve") |
Centerline Reverse Curve Details | June 2014 |
| M | M-3 |  |
Striping and Delineation for Freeway Terminals | June 2014 |
| M | M-4 |  |
Passing Lane Striping Details | June 2014 |
| M | M-5 |  |
Railroad Pavement Markings | June 2014 |
| M | M-6 |  |
Word Markings | June 2014 |
| M | M-7 |  |
Pavement Letters | June 2014 |
| M | M-8 |  |
Pavement Letters | June 2014 |
| M | M-9 |  |
Pavement Numbers | June 2014 |
| M | M-10 (1/3) | .jpg "Drawing M-10 (1of3) Pavement Marking Symbols") |
Pavement Marking Symbols | June 2014 |
| M | M-10 (2/3) | .jpg "Drawing M-10 (2of3) Pavement Marking Symbols") |
Pavement Marking Symbols | June 2014 |
| M | M-10 (3/3) | .jpg "Drawing M-10 (3of3) Pavement Marking Symbols") |
Pavement Marking Symbols | May 2025 |
| M | M-11 |  |
Turn Lane Pavement Markings | June 2014 |
| M | M-12 |  |
Wrong-Way Arrows | June 2014 |
| M | M-13 |  |
Preferential Lane Pavement Markings | January 2019 |
| M | M-14 |  |
Striping and Delineation for Truck Escape Ramps | June 2014 |
| M | M-15 (1/4) | .jpg "Drawing M-15 (1of4) Pavement Marking for Freeway Entrance") |
Pavement Marking for Freeway Entrance Ramp Tapered Acceleration Lane | August 2020 |
| M | M-15 (2/4) | .jpg "Drawing M-15 (2of4) Pavement Marking For 1-Lane Parallel Freeway Entrance Ramp") |
Pavement Marking For One-Lane Parallel Freeway Entrance Ramp | August 2020 |
| M | M-15 (3/4) | .jpg "Drawing M-15 (3of4) Pavement Marking For 2-Lane Parallel Freeway Entrance Ramp") |
Pavement Marking For Two-Lane Parallel Freeway Entrance Ramp | August 2020 |
| M | M-15-(4-4) | .jpg "Drawing M-15 (4of4) Pavement Marking For Freeway Parallel Acceleration Lane") |
Pavement Marking For Freeway Parallel Acceleration Lane | June 2014 |
| M | M-16 (1/2) | .jpg "Drawing M-16 (1of2) Pavement Marking for Freeway Exit Ramp Tapered Deceleration Lane") |
Pavement Marking for Freeway Exit Ramp Tapered Deceleration Lane | August 2020 |
| M | M-16 (2/2) | .jpg "Drawing M-16 (2of2) Pavement Marking for Freeway Exit Ramp Parallel Deceleration Lane") |
Pavement Marking for Freeway Exit Ramp Parallel Deceleration Lane | August 2020 |
| M | M-17 |  |
Freeway Lane Drop Pavement Markings | August 2020 |
| M | M-19 (1/11) | .jpg "Drawing M-19 (1of11) Raised Pavement Marker Plan Legend") |
Raised Pavement Marker Plan Legend | November 2024 |
| M | M-19 (2/11) | .jpg "Drawing M-19 (2of11) Non-Retroreflective Raised Pavement Marker Details") |
Non-Reflective Raised Pavement Marker Details | June 2014 |
| M | M-19 (3/11) | .jpg "Drawing M-19 (3of11) Retroreflective Raised Pavement Marker Details") |
Retroreflective Raised Pavement Marker Details | November 2024 |
| M | M-19 (4/11) | .jpg "Drawing M-19 (4of11) Retroreflective Raised Pavement Marker Details") |
Retroreflective Raised Pavement Marker Details | November 2024 |
| M | M-19 (5/11) | .jpg "Drawing M-19 (5of11) Pavement Marking Details for Undivided Highways") |
Pavement Marking Details for Undivided Highways | May 2015 |
| M | M-19 (6/11) | .jpg "Drawing M-19 (6of11) Retroreflective Pavement Markers (RPM) For Undivided Highways") |
Retroreflective Pavement Markers (RPM) For Undivided Highways | June 2014 |
| M | M-19 (7/11) | .jpg "Drawing M-19 (7of11) Freeway And Divided Highway Edge Line And Lane Striping") |
Freeway And Divided Highway Edge Line And Lane Striping | August 2020 |
| M | M-19 (8/11) | .jpg "Drawing M-19 (8of11) Lane Drop Marking And Ramp Or Intersection Guide Striping") |
Lane Drop Marking And Ramp Or Intersection Guide Striping | May 2015 |
| M | M-19 (9/11) | .jpg "Drawing M-19 (9of11) Pavement Marking Cross-Section Details For Highways And Freeways") |
Pavement Marking Cross-Section Details For Highways And Freeways | August 2020 |
| M | M-19 (10/11) |  Pavement Marking Cross-Section Details For Highways And Freeways") |
Contrast Lane Line Pavement Markings For Freeway And Divided Highway | June 2024 |
| M | M-19 (11/11) | .jpg "Drawing M-19 (11of11) Lead-Lag Contrast Pavement Marking Detail") |
Lead-Lag Contrast Pavement Marking Detail | Oct. 2023 |
| M | M-20 (1/2) | .jpg "Drawing M-20 (1of2) Chip Seal Marker Usage for Temporary Markings") |
Chip Seal Marker Usage for Temporary Markings | June 2014 |
| M | M-20 (2/2) | .jpg "Drawing M-20 (2of2) Chip Seal Marker Usage for Temporary Markings") |
Chip Seal Marker Usage for Temporary Markings | June 2014 |
| M | M-21 |  |
Transverse Rumble Strip Details | June 2014 |
| M | M-22 (1/4) |  |
Longitudinal Rumble Strip Groove, Pattern and Location Details | September 2021 |
| M | M-22 (2/4) |  |
Longitudinal Rumble Strip Exception Details | September 2021 |
| M | M-22 (3/4) |  |
Entrance And Exit Ramps Rumble Strip Installation Details | September 2021 |
| M | M-22 (4/4) |  |
Centerline Rumble Strip Groove, Pattern, And Location Details | March 2022 |
| M | M-23 |  |
Object Marker Details | June 2014 |
| M | M-24 |  |
Object Marker Placement Details | June 2014 |
| M | M-26 (1/5) | .jpg "Drawing M-26 (1of5) Delineator Placement and Spacing") |
Delineator Placement and Spacing | February 2021 |
| M | M-26 (2/5) | .jpg "Drawing M-26 (2of5) Delineator Placement and Spacing") |
Delineator Placement and Spacing | February 2021 |
| M | M-26 (3/5) | .jpg "Drawing M-26 (3of5) Flexible Delineator Assemblies") |
Flexible Delineator Assemblies | February 2021 |
| M | M-26 (4/5) | .jpg "Drawing M-26 (4of5) Square Steel Post Delineator") |
Square Steel Post Delineator | February 2021 |
| M | M-26 (5/5) | .jpg "Drawing M-26 (5of5) Delineator Foundation") |
Delineator Foundation Details | February 2021 |
| M | M-27 (1/2) | .jpg "Drawing M-27 Delineation Details for Median Crossovers") |
Delineation Details for Median Crossovers | February 2021 |
| M | M-27 (2/2) | .jpg "Drawing M-27 Delineation Details for Median Crossovers") |
Delineation Details for Median Crossovers | February 2021 |
| M | M-29 |  |
Off-Mainline Reference Marker Location Details | June 2014 |
| M | M-30 |  |
Off-Mainline Reference Marker Details | June 2014 |
| M | M-32 |  |
Bridge and Barrier Marker Details | June 2014 |
| M | M-33 |  |
Bridge and Barrier Marker Placement and Installation Details | June 2014 |
| M | M-34 |  |
Guardrail End Terminal Delineation Details | June 2014 |
| M | M-35 |  |
Object Marker for Sand Barrel Crash Cushion | June 2014 |
| S | S-1 |  |
General Signing Notes | April 2019 |
| S | S-2 (1/2) | .jpg "Drawing S-2 (1of2) S & W Breakaway Post Selection Chart") |
S & W Breakaway Post Selection Chart | June 2014 |
| S | S-2 (2/2) | .jpg "Drawing S-2 (2of2) S & W Breakaway Post Installation Details") |
S & W Breakaway Post Installation Details | June 2014 |
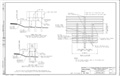
| S | S-3 (1/16) | .jpg "Drawing S-3 (1of16) Flat Sheet Signs Square Tube Post General Notes") |
Flat Sheet Signs Square Tube Post General Notes | June 2014 |
| S | S-3 (2/16) | .jpg "Drawing S-3 (2of16) Single Post Flat Sheet Rectangular Sign Assembly - 12, 18, and 24 Inch Widths") |
Single Post Flat Sheet Rectangular Sign Assembly - 12, 18, and 24 Inch Widths | June 2014 |
| S | S-3 (3/16) | .jpg "Drawing S-3 (3of16) Single Post Flat Sheet Rectangular Sign Assembly - 30, 36, 42, and 54 Inch Widths") |
Single Post Flat Sheet Rectangular Sign Assembly - 30, 36, 42, and 54 Inch Widths | June 2014 |
| S | S-3 (4/16) | .jpg "Drawing S-3 (4of16) Two Post Flat Sheet Rectangular Sign Assembly - 36, 42, and 48 Inch Widths") |
Two Post Flat Sheet Rectangular Sign Assembly - 36, 42, and 48 Inch Widths | June 2014 |
| S | S-3 (5/16) | .jpg "Drawing S-3 (5of16) Two Post Flat Sheet Rectangular Sign Assembly - 54, 60, and 72 Inch Widths") |
Two Post Flat Sheet Rectangular Sign Assembly - 54, 60, and 72 Inch Widths | June 2014 |
| S | S-3 (6/16) | .jpg "Drawing S-3 (6of16) Two Post Flat Sheet Rectangular Sign Assembly - 84-144 Inch Widths") |
Two Post Flat Sheet Rectangular Sign Assembly - 84-144 Inch Widths | June 2014 |
| S | S-3 (7/16) | .jpg "Drawing S-3 (7of16) Three Post Flat Sheet Rectangular Sign Assembly - 48, 60, and 72 Inch Widths") |
Three Post Flat Sheet Rectangular Sign Assembly - 48, 60, and 72 Inch Widths | June 2014 |
| S | S-3 (8/16) | .jpg "Drawing S-3 (8of16) Three Post Flat Sheet Rectangular Sign Assembly - 84-144 Inch Widths") |
Three Post Flat Sheet Rectangular Sign Assembly - 84-144 Inch Widths | June 2014 |
| S | S-3 (9/16) | .jpg "Drawing S-3 (9of16) Warning Sign Assembly - Single Post") |
Warning Sign Assembly - Single Post | June 2014 |
| S | S-3 (10/16) | .jpg "Drawing S-3 (10of16) Warning Sign Assembly - Two Post") |
Warning Sign Assembly - Two Post | June 2014 |
| S | S-3 (11/16) | .jpg "Drawing S-3 (11of16) Warning Sign Assembly - Three Post") |
Warning Sign Assembly - Three Post | June 2014 |
| S | S-3 (12/16) | .jpg "Drawing S-3 (12of16) Multiple Route Marker Assemblies") |
Multiple Route Marker Assemblies | June 2014 |
| S | S-3 (13/16) | .jpg "Drawing S-3 (13of16) Special Sign Assemblies") |
Special Sign Assemblies | June 2014 |
| S | S-3 (14/16) | .jpg "Drawing S-3 (14of16) Stringer Details for Square Tube Posts") |
Stringer Details for Square Tube Posts | June 2014 |
| S | S-3 (15/16) | .jpg "Drawing S-3 (15of16) Square Tube Sign Post Foundation") |
Square Tube Sign Post Foundation | June 2014 |
| S | S-3 (16/16) | .jpg "Drawing S-3 (16of16) Square Tube Post Slip Base Details") |
Square Tube Post Slip Base Details | June 2014 |
| S | S-4 |  |
W Shape Breakaway Post Fuse Plate and Hinge Details | June 2014 |
| S | S-5 |  |
W Shape Breakaway Post Details | June 2022 |
| S | S-6 |  |
S4x7.7 Breakaway Post Details | June 2022 |
| S | S-7 (1/3) | .jpg "Drawing S-7 (1of3) Aluminum Extrusion Sign Panel Details") |
Aluminum Extrusion Sign Panel Details | June 2014 |
| S | S-7 (2/3) |
|
Aluminum Extrusion Auxiliary Sign Installation Details | June 2014 |
| S | S-7 (3/3) | .jpg "Drawing S-7 (3of3) Aluminum Extrusion Exit Panel Installation Detail") |
Aluminum Extrusion Exit Panel Installation Detail | May 2015 |
| S | S-8 (1/2) | .jpg "Drawing S-8 (1of2) Flat Sheet Aluminum Panel on Breakaway Posts Installation Detail") |
Flat Sheet Aluminum Panel on Breakaway Posts Installation Detail | June 2014 |
| S | S-8 (2/2) | .jpg "Drawing S-8 (2of2) Aluminum Extrusion Sign to Perforated Posts Installation Detail") |
Aluminum Extrusion Sign to Perforated Posts Installation Detail | June 2014 |
| S | S-9 (1/4) |  Sign Installation on Pole") |
Sign Installation on Pole | August 2022 |
| S | S-9 (2/4) |  Signs (Back To Back) Installation on Pole") |
Signs (Back to Back) Installation on Pole | August 2022 |
| S | S-9 (3/4) |  Sign Installation on Signal Pole") |
Sign Installation on Signal Pole | August 2022 |
| S | S-9 (4/4) |  Sign Installation on Pole Band-Type Clamp") |
Sign Installation on Pole Band-Type Clamp | August 2022 |
| S | S-10 |  |
Milepost and Reference Location Signs | June 2014 |
| S | S-11 (1/2) | 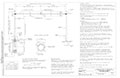 |
Tapered Tube Sign Structure Single Beam | November 2022 |
| S | S-11 (2/2) |  |
Tapered Tube Sign Structure Single Beam Post And Beam Details | April 2019 |
| S | S-12 (1/3) | .jpg "Drawing S-12 (1of3) Type A, B, and Down Arrows") |
Type A, B, and Down Arrows | June 2014 |
| S | S-12 (2/3) | .jpg "Drawing S-12 (2of3) Type C and D Arrows") |
Type C and D Arrows | June 2014 |
| S | S-12 (3/3) | .jpg "Drawing S-12 (3of3) C2 Arrow Detail") |
C2 Arrow Detail | June 2014 |
| S | S-13 |  |
Sign Identification Details | June 2014 |
| S | S-14 (1/3) | .jpg "Drawing S-14 (1of3) Rotating Open / Closed Sign") |
Rotating Open / Closed Sign | June 2014 |
| S | S-14 (2/3) | .jpg "Drawing S-14 (2of3) Rotating Open / Closed Sign Details") |
Rotating Open / Closed Sign Details | June 2014 |
| S | S-14 (3/3) | .jpg "Drawing S-14 (3of3) Rotating Open/ Closed Sign Mounting Details") |
Rotating Open/ Closed Sign Mounting Details | June 2014 |
| S | S-15 (1/3) | .jpg "Drawing S-15 (1of3) Rectangular Folding Sign Assembly") |
Rectangular Folding Sign Assembly | June 2014 |
| S | S-15 (2/3) | .jpg "Drawing S-15 (2of3) Rectangular Folding Sign Operation") |
Rectangular Folding Sign Operation | June 2014 |
| S | S-15 (3/3) | .jpg "Drawing S-15 (3of3) Diamond Folding Sign Assembly") |
Diamond Folding Sign Assembly | June 2014 |
| S | S-16 (1/2) | .jpg "Drawing S-16 (1of2) Temporary Wood Posts") |
Temporary Wood Posts | April 2019 |
| S | S-16 (2/2) | <.jpg "Drawing S-16 (2of2) Temporary Wood Post Selection Chart") |
Temporary Wood Post Selection Chart | April 2019 |
| S | S-17 |  |
End of Road Barricade | June 2014 |
| S | S-18 (1/11) | 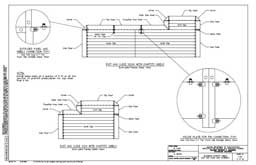 |
Aluminum Graffiti Shield Exit And Guide Sign Assembly | July 2019 |
| S | S-18 (2/11) | 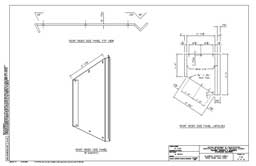 |
Aluminum Graffiti Shield Right Rider Side Panel | July 2019 |
| S | S-18 (3/11) | 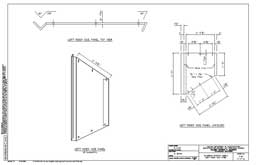 |
Aluminum Graffiti Shield Left Rider Side Panel | July 2019 |
| S | S-18 (4/11) | 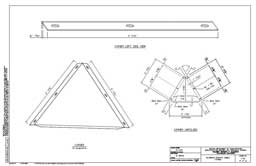 |
Aluminum Graffiti Shield Corner | July 2019 |
| S | S-18 (5/11) | 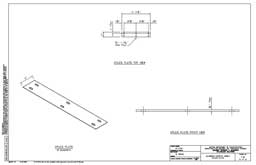 |
Aluminum Graffiti Shield Splice Plate | July 2019 |
| S | S-18 (6/11) | 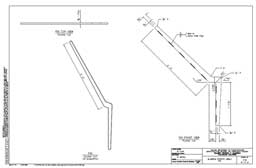 |
Aluminum Graffiti Shield Fin | July 2019 |
| S | S-18 (7/11) | 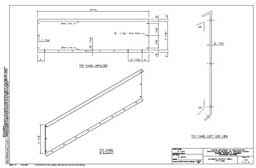 |
Aluminum Graffiti Shield Top Panel | July 2019 |
| S | S-18 (8/11) | 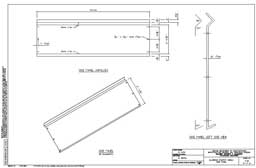 |
Aluminum Graffiti Shield Side Panel | July 2019 |
| S | S-18 (9/11) | 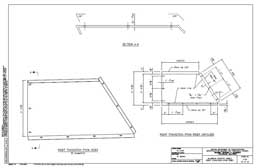 |
Aluminum Graffiti Shield Right Transition From Rider | July 2019 |
| S | S-18 (10/11) | 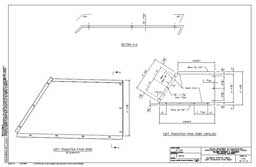 |
Aluminum Graffiti Shield Left Transition From Rider | July 2019 |
| S | S-18 (11/11) | 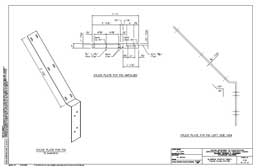 |
Aluminum Graffiti Shield Splice Plate for Fin | July 2019 |
| C | C-1 | 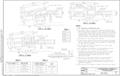 |
Sand Barrel Crash Cushion | December 2018 |
| C | C-2 | 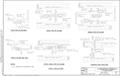 |
Sand Barrel Crash Cushion Typical Installation | December 2018 |
| C | C-3 (1/2) | .jpg "Drawing C-3 (1of2) Temporary Concrete Barrier") |
Temporary Concrete Barrier | June 2014 |
| C | C-3 (2/2) | .jpg "Drawing C-3 (2of2) Temporary Concrete Barrier") |
Temporary Concrete Barrier | June 2014 |
| C | C-4 (1/2) | .jpg "Drawing C-4 (1of2) Typical End Treatment For Detours Using Temporary Concrete Barrier (TCB)") |
Typical End Treatment For Detours Using Temporary Concrete Barrier (TCB) | June 2014 |
| C | C-4 (2/2) | .jpg "Drawing C-4 (2of2) Typical End Treatment For Detours Using Temporary Concrete Barrier (TCB)") |
Typical End Treatment For Detours Using Temporary Concrete Barrier (TCB) | June 2014 |
| C | C-5 (1/2) | .jpg "Drawing C-5 (1of2) Approach Plate Transition Section For Temporary Concrete Barrier") |
Approach Plate Transition Section For Temporary Concrete Barrier | June 2014 |
| C | C-5 (2/2) | .jpg "Drawing C-5 (2of2) Approach Plate Transition Section For Temporary Concrete Barrier") |
Approach Plate Transition Section For Temporary Concrete Barrier | June 2014 |